Layer farming is one of the popular aspects of poultry production. It is ranked as the second most practiced poultry venture in the world after broiler farming. If you intend to start a layer farm or want to learn more about layer farming, you’re on the right page.
This post will guide you on what layer farming or production is all about as well as all you need to do to get started.
What is Layer Farming?
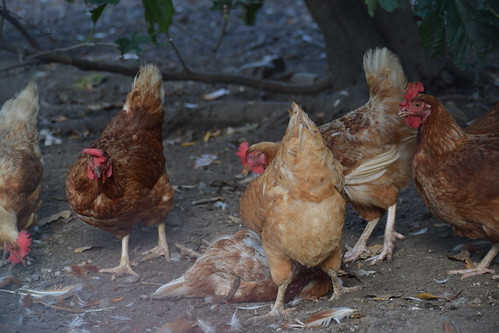
This is simply the art and science of raising hens (female chickens) primarily for the production of egg production and secondarily for meat. Layers are commercially viable egg-producing chickens.
Chicken eggs are in increasing demand due to their nutritional compositions that are beneficial to humans as well as their usage in confectionery. These have also led to the rapid growth of the poultry industry.
Laying Chicken Breeds
The breeds of egg-laying chickens are:
- White leghorns
- Rhode Island Red
- Nera Black
- Isa Brown
Housing Management in Layer Farming
To raise laying chickens, you will need a place to the house (pen) them. The quality of housing affects the laying performance of these chickens.
An easy to manage, clean and comfortable pen is one of the requirements for excellent growth and egg production for layers.
The following are required when sitting and building pens for layers
- The pen must not be built in crowded, noisy or residential areas or premises
- The pen should not be far from the market
- The road to the pen or farm should be good and accessible roads
- Good water, security and electricity must be readily available
- The pen must be well ventilated
- The pen house must be constructed in such a way that would ease drainage and cleaning
- Must be constructed in the east-west orientation to prevent direct sunlight from entering the house
- The roof must be made with long-lasting roofing materials and water-tight. It must also be wind-proof.
- The walls, floor and roof must be rat and wild bird proof
- The height of the pen house must be 3 meters from the foundation to the roof
- The land to be used must be well drained and should have tall trees around
- The pen should be far from other chicken pens to minimize the risk of disease spread
- The floor of the pen should also be slightly sloppy and preferably concreted
Housing Systems
For commercial layer production, there are three common housing systems. They are:
- Deep-Litter System
- Battery Cage System
Deep-litter system
In this system, the chickens are kept on the floor of a pen or enclosure and they are provided with everything they need which include feed, water, vaccine and drugs. The characteristic feature of this system is that the chickens are kept on the floor covered with litter material that can absorb moisture from the droppings. These materials could be dry wood shavings, rice husks, chopped hay or straw, groundnut hulls, etc. You can view others here.
The ventilation, lighting, drinkers, feeders or feeding trough and the nesting box (where the eggs are laid) are made available. So the chickens are fed in the morning, afternoon or before dusk and water is made available round-the-clock.
Litter also helps to control disease and enhances egg cleanliness in laying flocks. In addition to the necessary feeding and watering equipment, the system may utilize nests or roosts or dropping pits, depending upon the type of bird housed.
Advantages of the deep-litter system
- The chickens and eggs are safe from wild birds and animals
- It saves labour and money required for regular cleaning and buying of cages
- The litter can be used as manure
- Record keeping is possible
- It is suitable for all kinds of weather conditions irrespective of location
- The specific need or requirement of the chickens can be provided
Disadvantages of the deep-litter system
- It can constitute a nuisance or environmental pollution if not properly managed
- During a diseases outbreak, the spread might be difficult to curtail
- Litter material may become scarce
- Eggs loss and a high number of cracks
- Cannibalism and bullying cases are higher as rogue chickens become threats to others in the flock
- It requires prompt monitoring, supervision and the highest commitment of time and resources
- Hens may become brooding, hence won’t lay eggs again
- For optimal production, expertise and experience are required
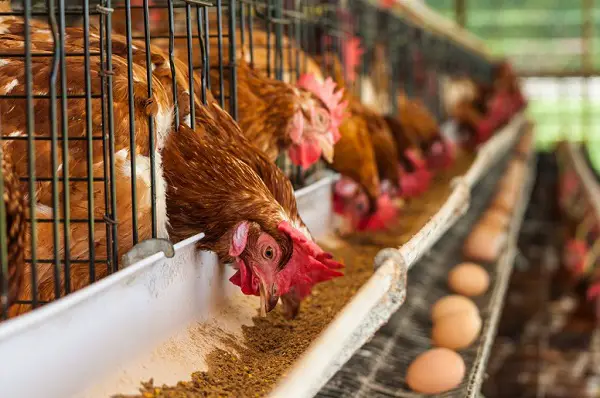
Battery Cage System
In this system, the chickens are kept in a pen but confined to a cage just large enough to permit very limited movement and allow her to stand and sit comfortably. This system is the most intensive type of commercial chicken production and is useful to those with only a small floor space at their disposal. The floor is of strong standard galvanized wire set at a slope from back to the front, so that the eggs as they are laid, roll out of the cage to the egg collection area.
Advantages of the battery cage system
- The chickens and eggs are safe from wild birds and animals
- The faeces of chickens can be used as manure
- Record keeping is possible and easier
- It is suitable for all kinds of weather conditions irrespective of location
- The specific need or requirement of the chickens can be provided or met
- Feeding of birds and the collection of eggs are easier
- Highest stocking rate as more chickens can be kept within on a small floor space
- Vaccination, medication and other occasional operations are easier
- Less risk of disease, because the birds are not in contact with droppings
- Higher egg weight
- Lower feed intake (about 3-4%) and better feed conversion rate
- Labour saving
- Easier supervision, culling or selection
- No floor eggs and no broody hens
Disadvantages of the battery cage system
- The system is relatively high initial investment costs per bird
- The system is not flexible
- Technical problems usually occur especially if maintenance is not up to standard
- The percentage second class eggs is higher
- Pen ventilation is likely to require more attention and control
- De-beaking and light intensity control are necessary
While both the deep litter system and the battery cage system are ideal for commercial layer production, the battery cage is highly recommended where financing is not a challenge.
How to Start Layer Farming
One of the simplest and best ways of starting the laying flock is to buy started pullets. This avoids the need for equipment and the care involved in brooding chicks. You can buy point of lays from commercial growers or other farms at 13 to 16 weeks of age.
Pullets should be debeaked to avoid feather picking, egg-eating and cannibalism. Ten to fifteen birds will normally provide the average family with enough eggs. Bear in mind that a healthy, well-managed laying flock can produce 260 eggs per bird in a laying year.
Buying of Day Old Chicks
The importance of selecting the right stock should be re-emphasized here. After deciding on the breed or strain you want, be sure to buy healthy stock from hatcheries.
Buy the best chicks you can buy. Cheap chicks may cost you more in the end than those that cost most in the beginning. Poor results with the growth or livability can soon erase any savings you may have made in the purchase of chicks.
Get chicks from a source known for having birds with high egg production records. There are great differences among types of birds, insofar as egg size, egg production, feed, efficiency, livability, and many other economic traits are concerned.
Brooding & Rearing Day Old Chicks
Brooding facilities can affect the degree of success one has in growing chicks. As indicated earlier, an expensive building is not necessary, but the facility should be built to brood chicks efficiently.
One of the features of a good brooder house is its structural soundness to withstand high winds. It should be of light construction, with sufficient insulation against drafts, and easy to maintain a uniform temperature economically. It should be able to conserve or dissipate heat. It should also have some degree of light control in the house.
Click here to read more about brooding
Management of Layer Chickens From Day 1 to Week 8 (Brooding)
During the brooding period, young chickens need special care.
Temperature
Young chicks cannot yet regulate their body temperature themselves. So, normally artificial heating is provided during the brooding period. Brooder operations require heating of a whole house. In the tropics, heat may be provided to a particular area in the house, a corner or one room only, at least during the night.
Artificial heat sources are:
- Electric brooder (infrared heat bulbs)
- Gas brooder (gas heaters)
- Kerosene brooders (kerosene lamp/kerosene heater)
- Charcoal
The recommended temperatures for layer chicks:
- 1st day (33-34°C)
- 2nd day (32°C)
- 1st week (30°C)
- 2nd week (30-25°C)
- 3rd week (28-25°C)
- 4th week (25-20°C)
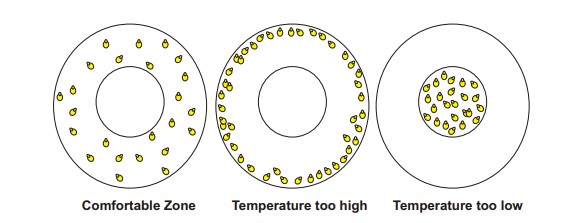
When the temperature is too high we see that:
- The chicks sit with spread-out wings and open beaks (rapid breathing).
- The chicks sit as far as possible away from the heat source.
- There is less feed intake: the chicks drink more and this often causes wet litter.
- The chick might start pecking each other’s feathers.
When the temperature is too low we see that the chicks:
- Come close together
- Are less active
- Will raise their feather cover
- Will stay close to the heat source
Light
The chicks will eat when there is light. As eating must be stimulated especially early in the brooder period, artificial lighting is a must. However, gradual reduction of the light is recommended:
Confinement
To confine the chicks around the source of heat and to prevent draughts it is necessary to erect a brooder guard around them; for instance, made from 2 pieces of plywood joined to make a circle; about 50 cm high. There should be no cracks in this guard as they will cause draughts.
Litter
Litter absorbs moisture (from droppings) and provides scraping material for the chicks. The best material for litter is short wood shavings. At all times prevent litter from getting wet or dusty.
Equipment
When brooding, there are some materials or equipment that must be available. Find them here.
Feed
Chick mash is required, to which broad-spectrum antibiotic is added. If necessary the feed should also contain a coccidiostat.
Health and Condition at Arrival
- Day-old chicks should preferably be delivered in the morning when it is still cool. This also makes it possible to observe them for a full day.
- Do not allow the personnel delivering the chicks to enter the chicken house.
- Check mortality, quality and thriftiness of the chicks
- Place the chicks in the brooder heat
- Small numbers can be counted, larger numbers have to be estimated
- If the chicks have to be vaccinated (preferably by the spray method) – do this quickly and efficiently
- Provide the chicks with quietness
Some standards for chick quality at arrival are:
- No deformities
- No unhealed navels
- Above a minimum weight
- Not dehydrated
- Down colour representative of the breed
- Chicks standing up well and being lively
Males can be recognized at 6-8 weeks in unsexed flocks by the following characteristics:
- In cocks the feathers are more pointed than in hens, whose feathers are smaller and rounded
- Cocks usually have a bigger comb
- Cocks stand in a more upright position than hens
Management of Growers
Growers are between 8 and 22 weeks of age. They are the future laying birds and the way they grow up will largely determine how well they do in the laying house. Therefore management during the growing period is very important.
Housing
There are three housing systems for growers.
- Brooding-growing-laying house in one.
- After the brooding house, the birds are transferred to a growing/laying house.
- After the brooding period, the birds are transferred to a growing house and from there (at 18 weeks of age) to a laying house.
Management Procedures
- Sanitation is very important during the growing period. So keep everything clean and refresh the disinfectants regularly.
- Always keep visitors out.
- Administer anthelminthic drugs to control internal and external parasitic or worm infestations.
- Rats and mice can consume a lot of feed and spread diseases. Start a rodent elimination programme if they already constitute a nuisance.
- Growing houses should be separated from houses containing birds of other age groups.
- Vaccinate the birds following the standard vaccination schedule for layers for your region.
- Watch the medicine dosage very carefully. Do not overtreat or undertreat birds.
- Cockerels should be separated from the flock as soon as possible and reared separately.
- Reduce light (daylight or artificial light) during the growing period. This will delay the beginning of egg laying.
- Inferior, sick, crippled, injured and deformed birds should be removed from the flock daily (culling).
- Always take a record of relevant information such as feed, water, drug, mortality and stock balance.
- Carefully kept records inform the poultry keeper about the past and are helpful in planning future operations.
Management of Laying stock
The laying period is taken to have started when the birds reach 5% egg production on a hen day basis. The laying period continues until the birds are sold at the end of a laying period of normal length, or are force-molted.
Housing time starts with the beginning of the laying period. The number of birds housed is the number of pullets in the laying house when egg production starts.
Because of variations in rearing management procedures, pullets may be transferred to permanent laying houses (in the multi-stage system) at ages between 8 and 21 weeks. Laying houses are thus used for ‘growing’ for different periods of time before the birds reach 5% egg production on a hen/day basis.
In commercial egg production, cocks are not allowed in the laying house because they consume feed and fertilized eggs spoil more rapidly than unfertilized eggs.
Preparing the House for Layers
At the time when chickens are moved from growing pens to laying pens, the following things should have been put in place already.
- Cleaning of the house thoroughly.
- Provision of fresh litter
- Putting in place of all necessary equipment, in working condition.
If the chickens are grown in the laying house, the above would have been in place. However:
- Nests should be brought in about a week before the first eggs are laid and proper nesting material should be provided.
- A selection should be carried out; all birds considered to be unfit for laying should be removed.
If pullets have to be moved from one house to another, then apply the following rules:
- Handle the birds carefully; catch them by both feet and do not pick them up by the wing.
- Do not move birds during the hot part of the day; shift them in the early morning or later in the night.
Feeding the Layers
- When daily egg production is 10%, make a gradual change from the grower feed to the layer feed.
- Use a mix of both grower and layer feeds for one week.
- An increase in lighting time should coincide with the change of feed.
- Watch out for a drop in feed consumption; this is the first sign that something is wrong with the birds.
- About 70% of the costs in poultry production are the costs of feeds, so there is no room for wasting of feed. This is the reason why the feeders should be placed properly and eliminate rats and mice.
- Check regularly whether feeders function properly and eliminate rodents.
Click Here to View Layers Feeding Chart
Management Tips
- When the ambient temperature is high, chickens consume less feed. So in hot climates, artificial lighting should be provided to allow the birds to eat when the temperature is relatively comfortable (early in the morning or in the night).
- Collect the eggs several times a day like 9 am, 11 am, 1 pm and 5 pm.
- With an artificial lighting programme the hours of egg collection should be adjusted to the time that the light is on.
- During hot periods it may be necessary to collect the eggs more frequently to avoid the bird breaking and sucking eggs.
- Avoid collecting the eggs in baskets or buckets. You will record more cracked eggs.
- Dirty eggs may be cleaned by rubbing with a very fine cloth while dry. They should never be washed, because this would favour the entrance of bacteria through the shell of the egg.
- Broodiness can be treated by placing the broody hen in a small cage with a wire floor.
- Daily removal of inferior and unproductive birds is crucial.
- Maintain strict hygiene and sanitation and administer drugs when necessary.
- Keep records of important data.
- If automatic equipment is present (for feeding, water supply, lighting, switches), check daily whether everything is in order; replace worn-out parts without delay.
- Make sure that the farm never runs out of feed. If this happens and you starve your birds, their egg production will reduce.
- Weigh the daily feed supply to avoid underfeeding and overfeeding.
- Dead (diseased) birds should be disposed of by burning in an incinerator.
- Don’t allow your birds to come into lay too early. If they do, most of them will suffer from prolapse. One of the ways to prevent this is by reducing light (daylight or artificial light) during the growing period.
- It is important not to supply antibiotics to stimulate egg weight and egg production during the first months of egg laying or to change to layers’ feed too early.
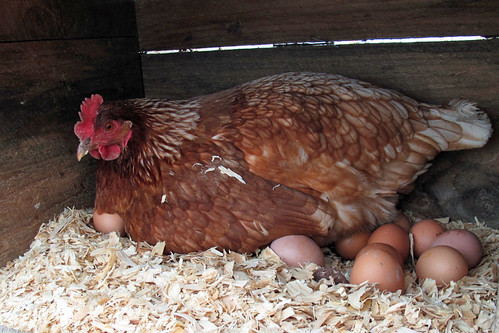
How to Make Layers Lay inside the Nests in Deep Litter System
- Place nests in the darkest spot in the house
- Provide suitable and ample nesting material
- Make sure that the number of nests is adequate
- Close the nests at nightfall
- Darken the nests with a kind of curtain
Medication and Vaccination
The standard vaccination programme for layers from day 1 until 16 weeks of age is as follows:
| Age | Vaccine | Route |
|---|---|---|
| Day 1 | Marek's Disease | Given at the Hatchery |
| Day 9-14 | Newcastle Disease (NDV) | Drinking water, eye drop |
| " | Infectious Bronchitis (IBV) | Drinking water |
| Day 14 | Gumboro/Infectious Bursal Disease (IBDV) | Drinking water |
| Day 28 | Gumboro/Infectious Bursal Disease (IBDV) | Drinking water |
| Week 4 | Newcastle Disease (NDV) | Drinking water or eye drop |
| " | Infectious Bronchitis (IBV) | Drinking water |
| Week 8 | Fowl pox | wing web jab |
| " | Avian Encephalomyelitis (AE) | wing web jab |
| Week 9 | Infectious Coryza 1 | Intramuscular |
| Week 10-11 | NDV (Komarov Strain) | Intramuscular |
| Week 12 | Infectious Coryza 2 | Intramuscular |
| " | Infectious Bronchitis (IBV) | Drinking water |
| Week16 | Laryngotracheitis | Spray or eye drop |
| Week 17 | ND + IB + EDS (3 in 1 Vaccine) | Intramuscular |
IAM intrest in the bussness
Thank you for your information. Very comprehensive.
How can we get a a soft copy?