Table of Contents
It is impossible to determine all the qualities of an egg just by examining only the outside of the egg. Identifying thin spots, double yolks and hairline cracks in the eggs of chickens, turkeys, ducks, geese and pheasants requires candling the eggs.
What is egg candling and why is egg candling important?
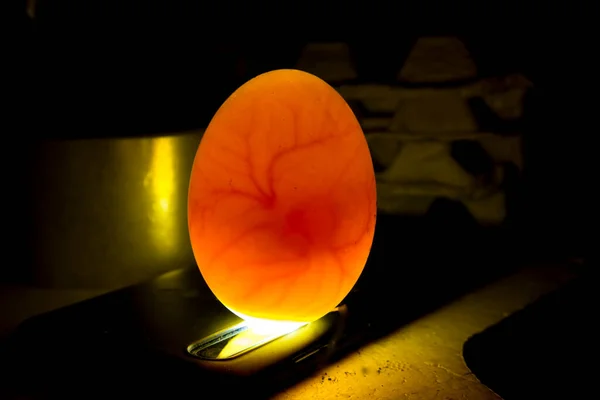
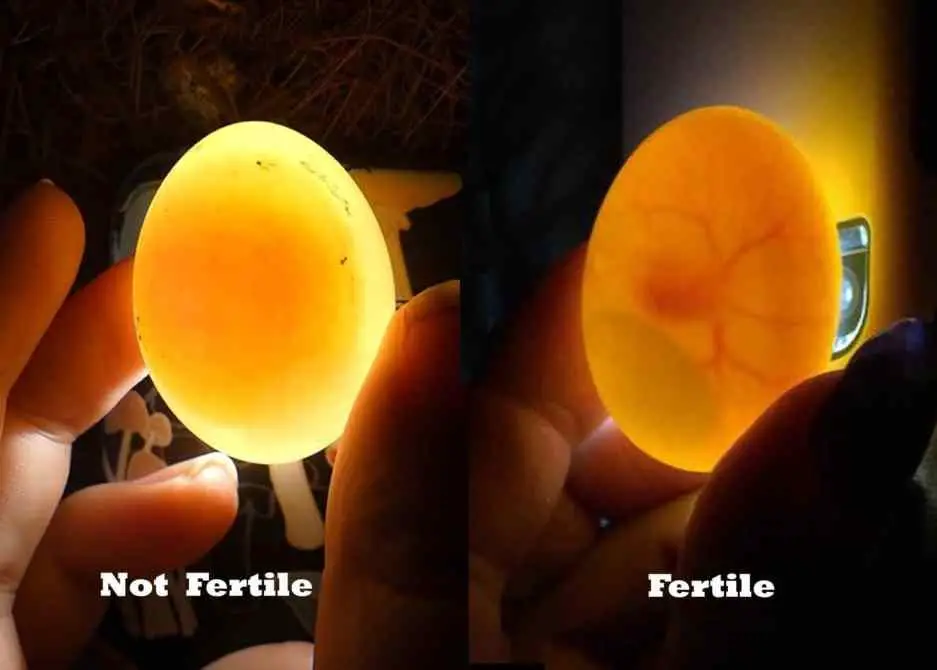
Egg candling is a process of shining a bright light through an egg to check for signs of embryo development inside the egg. It is the simplest method to determine if an egg is fertile or not, assess the quality of the egg or find any defects.
Candling can be done with a special candling light or even a flashlight. The light allows you to see the shadows of the embryo inside the eggshell.
Egg candling devices
Various devices are built or designed specifically for candling eggs of birds such as chickens, turkeys, ducks, geese and quails. Most of these devices resemble small flashlights powered by batteries or electricity. Even though there are battery-powered egg candlers, a small flashlight or smartphone flashlight can be used for the same purpose.
To candle an egg, all you need is a bright light that comes through an opening smaller than the diameter of the egg you want to candle. So, with a small flashlight like the one below, you can easily candle and assess the inside of an egg.


Candling is best done in a dark room. Hold the egg at a slight angle, the large end to the light. Make sure your fingers are not blocking the light. Turn the egg until you see something or are certain there is nothing to see.
A battery-powered OvaScope candler is a more expensive but fun and easy-to-use egg candler. It comes with a black plastic hood resembling a microscope, making it a great option for those wanting to look closer at their eggs. The scope-like hood blocks ambient light, making it easier to view the egg. You can use the candler alone or with the scope-like hood surrounding the egg and candler. The candling cylinder on which the egg is mounted has an adjustment wheel that lets you rotate the egg while examining it. The scope also slightly magnifies an egg, which is handy when candling smaller eggs.


How to Candle Eggs
To candle eggs, you will need a dark room and a bright light source. You can use a flashlight, a candling lamp, or a special candling device (egg candler) that fits over the egg. The light source should be strong enough to penetrate the shell and illuminate the content of the egg.
- To candle an egg, hold it gently in one hand and place the light source against the large end of the egg.
- Tilt the egg slightly to see the air cell, a pocket of air between the shell and the membrane. The air cell should be at the large end of the egg and should increase in size as the incubation progresses.
- Rotate the egg slowly to see the rest of the contents. You should see the yolk, a yellow sphere that floats in the albumen (the white part of the egg). The yolk should be centered and not touch the shell. You should also be able to see blood vessels that radiate from the yolk and form a network around the embryo. The embryo is a dark spot on the yolk that moves and grows as the incubation progresses.
What to Look for When Candling Eggs at Different Stages of Incubation
Depending on how far along the incubation is, you can look for signs of development and health when candling eggs. Here are some general guidelines for what to look for at different stages:
- Day 1-3: You may not see much except a faint red ring around the yolk. This is called a blood ring and indicates that fertilization has occurred and blood vessels are forming around the embryo.
- Day 4-7: You should be able to see a dark spot on the yolk, which is the embryo. You should also see blood vessels branching out from the embryo and forming a network around it. The air cell should be small and at the large end of the egg.
- Day 8-14: You should be able to see more details of the embryo, such as its head, eyes, wings, legs, and beak. You may also see movement and heartbeat. The air cell should be larger and take up about one-third of the egg.
- Day 15-18: You should be able to see almost all of the features of the chick, such as its feathers, claws, and comb. The chick should fill most of the space inside the egg and move less frequently. The air cell should take up about half of the egg.
- Day 19-21: You should not candle eggs at this stage, as it may disturb or harm the chick. The chick should be ready to hatch soon and will break through the air cell and then through the shell.
It’s important to reference an egg incubation chart when candling eggs at different stages of incubation to ensure that you are on track for a successful hatch.
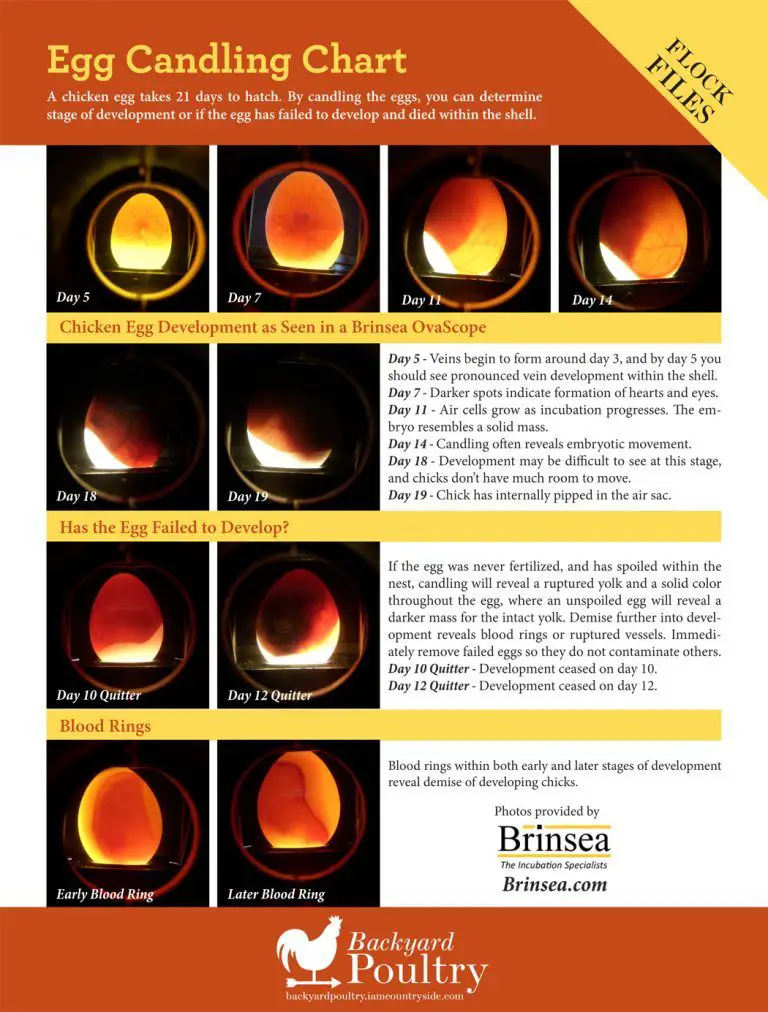
Egg Candling Chart
An egg candling chart is a visual guide that shows you what to look for when you candle your eggs at different stages of incubation. The chart usually includes pictures or drawings of eggs and descriptions of the features and stages of embryonic development. With an egg candling chart, you can monitor the embryo’s growth, check the size of the air cell, and remove any non-viable eggs that might spoil or explode.
The photo below is a typical chicken egg candling chart.
What to Do If You See Problems or Defects When Candling Eggs
Sometimes, you may see problems or defects when candling eggs that indicate something is wrong with the egg or the embryo. Some common problems or defects are:
- Clear eggs: When candled, these eggs have no signs of development or blood vessels. They may be infertile or dead.
- Blood rings: These eggs have a red ring around the yolk that does not grow or develop into blood vessels. They may indicate that fertilization occurred but that the embryo died early in development.
- Rotten eggs: When candled, these eggs have a foul smell or a dark or cloudy appearance. They may indicate that bacteria or fungus have infected the egg and killed the embryo.
- Shrink-wrapped chicks: These chicks have dried out inside the shell and cannot break free. They may indicate that humidity was too low during incubation or hatching.
- Malpositioned chicks: These chicks have not positioned themselves correctly inside the shell for hatching. They may have their head at the wrong end of the egg or their feet over their head. They may indicate that the temperature was too high or low during incubation or hatching.
- Hairline cracks and other eggshell defects: Cracks appear as white veins in the shell. Since cracks open the way for bacteria to penetrate an egg, remove cracked eggs from your selection. Cracks occur more in thin-shelled eggs because thin shells are not strong.
If you see any problems or defects when candling eggs, you may want to remove them from your incubator and dispose of them safely. However, some problems or defects may not be immediately apparent and may only become apparent during later stages of incubation. In such cases, waiting and observing the egg further may be best before deciding.
Wrapping Up
Egg candling is a useful technique for monitoring the development and health of embryos during incubation. By knowing what to look for at different stages of incubation, you can identify potential problems or defects early on and take appropriate action. Remember to handle the eggs gently and avoid candling eggs during the final stages of incubation to avoid harming the developing chick. With practice, candling can be an effective tool for successfully hatching and raising healthy chicks.