Table of Contents
Incubating turkey eggs is a process that takes time and patience, but it is worth it to see those little poults hatch and grow into adults. In this article, we will discuss the basics of incubating turkey eggs and provide some tips to help you get started.
Things required for incubating turkey eggs
The first step to incubating turkey eggs is to ensure you have everything you need to get the job done. This includes everything from a fully functioning incubator to fertile turkey eggs, candler, thermometer and hygrometer.
1. Egg Incubator
The number one piece of equipment you need is an egg incubator. An egg incubator can be purchased or homemade. If you are looking for a commercial incubator, we recommend the Brinsea Ovation 56 EX Egg Incubator.

This is a great low-cost option for any small backyard flock. If you prefer to build your own, we have an extensive incubator post that covers the many options out there. In a nutshell, as long as it is thermostatically controlled and has proper humidity, you’re golden!
2. Fertile Turkey Eggs
Another vital thing you need is fertile turkey eggs! Whether you are purchasing or collecting turkey eggs from your flock, the goal is to hatch turkey poults. Make sure you know the difference between fertile eggs and infertile eggs. Infertile eggs will not hatch. This is why you need to check for egg fertility through the candling method.
3. Candling Device
This is a piece of equipment that is used to check the fertility of turkey eggs. This is a vital device because you need to know if the eggs are fertile, infertile or dead.
You can purchase a turkey egg candler online or at most farm supply stores. If you do not own one, you will want to use a bright light source and hold the egg close to your eye to give you a visual image of what is inside the egg.
If you want to buy a turkey egg candler, we recommend the Brinsea Ovascope Egg Viewer.

4. Thermometer and Hygrometer
A thermometer and hygrometer are essential to the incubation process. A thermometer is a device that measures the temperature in the incubator while a hygrometer is a tool or device that measures the humidity within the incubator.
Both the thermometer and hygrometer are critical for you to keep a close eye on the temperature and humidity of your turkey eggs during the incubation process. The thermometer is your guide to how warm or cold your incubator is and the hygrometer tells you the amount of water vapor in the incubator.
You need to know the temperature inside your incubator to know if the temperature is right for the chicks. If the temperature is too low, the incubation process will not work and the chicks will not hatch.
We recommend the Triplett RHT22 Digital Indoor Hygro-Thermometer and SMARTRO SC42 Professional Digital Hygrometer and Thermometer which are economical and will still accurately give you the temperature and humidity inside the incubator in real-time. Again, this is the cheapest option; you can certainly upgrade if you want.
How long does it take for turkey eggs to hatch?
For someone who wants to incubate and hatch turkey eggs, it is important to know the turkey egg hatching time or turkey incubation period.
Turkey eggs take 28 days to hatch. Hence, the incubation period for turkey eggs is 28 days. The eggs, however, should be kept at 99.5oF or 37.5oC and 55-60% relative humidity (RH).
How to Incubate Turkey Eggs
Step 1: Check if the eggs are fertile or Not
Only fertile eggs can develop and hatch. To avoid wasting your time, energy and money, it is very important to check the fertility status of the turkey eggs that you want to incubate.
You can tell whether turkey eggs are fertile or not by candling them. Candling is the process of using bright light to illuminate the contents of an egg. Candling is the safest and simplest method of checking the fertility of an egg. The device or instrument used for egg candling is called an egg candler.
Candling will allow you to see inside the egg and determine if there is a developing embryo inside or not. You can do this by holding the egg up to a light source, such as a flashlight. A developing embryo will look like a black dot on one end of the egg. The size of the black spot is a good indication of how far along the embryo is. The black area will gradually become bigger and bigger.
If you see a white ring around the black dot then the egg most likely is not fertile and needs to be thrown out. If the egg is fertile, the embryo will start to grow, and then move into the air space at the large end of the shell.
Read more about Egg Candling here
Step 2: Set up and prepare the incubator
If you are interested in hatching turkey eggs, it’s best to use an egg incubator, particularly if you don’t plan to leave all of the responsibility of hatching to the turkey hen. Before you even begin to use the device, you’ll need to:
- Make sure it is hygienic for use and that you’ve properly cleaned and sanitized it.
- After the incubator has been cleaned, heat the device for 24 hours before the placement of any eggs.
- Add enough water to maintain the right level of moisture (humidity) as well as place a thermometer and hygrometer to monitor the temperature and humidity respectively.
Step 3: Pre-incubation steps
Now you are ready to use the incubator. However, you still have a couple of key steps you’ll want to take to ensure high hatchability.
- Take any warm eggs that have just been laid and clean up any accumulated dirt or residue on the shell with a clean cloth.
- Next, pre-store the eggs for at least 12 hours at around 60oF or 16oC. Pre-storing the turkey eggs before incubation is helpful as it makes the eggs more resilient to handling.
- In addition, before incubation begins, you’ll want to preheat the eggs for 12 hours as well. Warm the incubator to 72oF or 22oC to ensure hatching.
The Incubation Period for Stored Eggs
If you place your eggs in storage, you should add one hour for each day that the egg is stored. Therefore, when hatching turkey eggs, the normal incubation period lasts 28 days. If the egg has been in storage, say, for two days, then the incubation period would last 28 days and two hours.
Step 4: Setting and incubating the eggs
After you complete the preparatory steps, heat the incubator to 99.5oF or 37.5oC and ensure the relative humidity is 40-50%. Place each egg in the incubator. Don’t try to adjust the incubator to a higher temperature if it falls below the above-stated temperature or you could find your eggs cooked instead of hatched. The temperature drop is natural as any cooler eggs introduced in the incubator will cause the air temperature to cool as well.
Step 5: Turning the eggs
During the incubation period, you should turn your turkey eggs around five times each day. Make sure you turn the eggs an odd number of times to ensure that the egg is not lying on the same side every night.
Rotate each egg a full 180 degrees, washing your hands before turning them. Cleaning your hands is important as they contain oils that can penetrate the eggshell which can harm the baby turkeys. So, make sure you thoroughly wash your hands before handling or turning the eggs.
Stop turning the eggs about three days before they are due to hatch, or around day 25 of the 28-day incubation period. In addition, make sure that the relative humidity level during hatching is around 60-70%.
Step 6: Hatching of the eggs to poults
The turkey poults may take as long as ten hours to fully hatch and break out of their shells. Hence, don’t try to speed up the process by helping them as doing so may harm them. Wait for 8-12 hours before removing the poults from the incubator.
By following the above steps, you will find hatching turkey eggs can be a fun and rewarding process.
A turkey egg incubator is an important piece of equipment for anyone raising turkeys. By providing the right environment for the eggs to hatch, you can ensure that your poults will have the best chance at a healthy life.
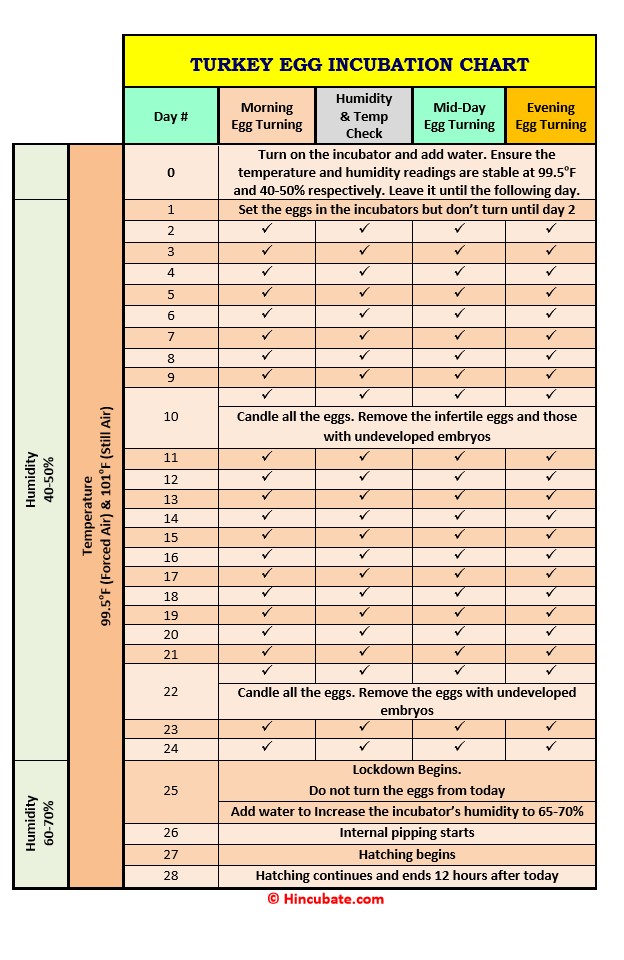
Turkey Egg Incubation Chart
This turkey egg incubation chart has been designed for anyone who wants to hatch their turkey eggs at home. This incubation chart shows the ideal temperature, humidity, and turning frequency for each day of incubation. It also includes some tips for a successful hatch. You can download the chart as a PDF file or print it.