Table of Contents
Hatching eggs is not a difficult or complex procedure. The best way to hatch a chicken egg is to let it happen naturally. In this natural process known as setting, a broody hen sits on eggs for days to keep them warm until they are ready to hatch.
In the absence of a broody hen at home, you can use an egg incubator to do the job of a mother hen. The incubator helps maintain the warmth of the chicken eggs and thereby helps the embryo develop.
Incubating chicken eggs using incubators could be a quite difficult task for starters, but it usually comes with lots of fun when you’ve mastered the process. There are a few basic things you need to know before getting started. In this guide, we will discuss the necessary steps for incubating chicken eggs successfully. We will also provide tips on how to get started.
Things required for incubating chicken eggs
To incubate chicken eggs, you will need a few essential items. These include a chicken egg incubator, fertile turkey eggs, egg candler, thermometer and hygrometer.
1. Chicken Egg Incubator
A chicken egg incubator is the most important device you need to incubate and hatch your fertile chicken eggs. You can either buy or create your egg incubator. Some people choose to build their incubator, however, I would suggest you buy one. If you are buying a chicken egg incubator, the Brinsea Ovation 56 EX Egg Incubator is the most recommended and it is worth the money.

This is a relatively inexpensive option for someone who intends to hatch not too many eggs or a farmer with just small backyard chickens. You can read this article if you want to build your incubator.
Also Read: How to Build a Homemade Egg Incubator
2. Fertile Chicken Eggs
An unfertilized egg cannot hatch. This is why it is important to check the fertility status of the chicken eggs before you even start the incubation process. The use of an egg candler is the most reliable way to check if a chicken egg is fertile.
3. Candling Device
An egg candler is a device used for checking the fertility of poultry eggs. You need it to know if an egg is fertile, non-fertile or dead. You can get the Brinsea Ovascope Egg Viewer for accurate egg candling tasks.

Also Read: How to Candle Chicken Eggs + Candling Chart
How long does it take for chicken eggs to hatch?
It is vital to know the chicken egg incubation period or hatching time. Chicken eggs take 21 days to hatch. So the incubation period for chicken eggs is 21 days. Also, the ideal incubating temperature and humidity for chicken eggs are 99.5oF or 37.5oC and 45-50% respectively.
How to Incubate Chicken Eggs
Step 1: Obtain or collect healthy fertilized chicken eggs
If you are considering hatching eggs with an incubator, the first thing you have to do is to collect some healthy fertilized chicken eggs. You can procure fertilized chicken eggs directly from a hatchery or a poultry farm.
Medium-sized eggs are the most appropriate ones for hatching and hence choose only those eggs that are not too big or too small. Also, be careful to select clean and well-shaped eggs without any cracks or holes.
Step 2: Choose an incubator
A forced-air incubator is large, great for large numbers of eggs and has a fan. A still-air incubator is smaller, hatches fewer eggs and does not have a fan. Most experts prefer a forced-air incubator. Read this article to know which incubator suits your needs.
Step 3: Clean and place the incubator in the right spot
After you have the incubator, you will want to clean it thoroughly (very thoroughly). Then the next part is to find a good spot for it. The best spots are where there are no temperature changes. Avoid placing the device near windows or next to refrigerators, heating vents, air conditioners, etc. Your incubator probably came with a hole in it for oxygen; make sure that the hole is not closed or covered up.
Step 4: Test the incubator
Now, this part is where most people make a pretty big mistake. You don’t want to just turn on the incubator and put the eggs in. Test your egg incubator before putting eggs into it for about twenty-four hours to make sure the temperature and humidity stay consistent within the incubator. The incubator should be placed indoors and the room should have proper ventilation and the ability for moving air.
Also, put water in the incubator when you first fire it up. The main purpose of testing the incubator is to make sure the temperature and humidity stay consistent within the incubator. Don’t forget that the incubator should be placed indoors and the room should have proper ventilation.
Step 5: Set the eggs in the incubator
Place the fertile chicken eggs into the incubator. The temperature will naturally go down in the incubator for the first few hours. Do not adjust the temperature for the first 48 hours after setting the eggs. The incubation period is about 21 days. Never set eggs with the small ends pointing upward. Set the eggs inside the incubator with their larger end facing upward.
Step 6: Ensure a steady temperature is maintained and regularly turn the eggs
Keep the temperature steady at about 99.5oF in a forced-air incubator. In a still-air incubator, the temperature should be kept at about 101oF. Set the humidity at 45-50% and then increase it to 65% when the eggs start hatching.
Turn the eggs about half a turn at least 3 times a day to avoid egg yolk sticking to the shell. However, after 18 days you can stop turning the eggs and only have to open up the incubator to add more water. It’s helpful to take a sharpie and draw a minus on one side of the egg (–) and a plus (+) on the other side so you know if you have turned it. It’s important to wash your hands before touching the eggs and also to do it gently and quickly.
Step 7: Prepare for the hatching day
The chickens will hatch on the 21st day. Of course, sometimes this varies by one day in either direction, so it is important to observe your eggs during this time. If some chicks hatch early then just let them stay in the incubator. You should also increase the humidity to 65-70%. You can do this in several different ways, one of which is adding a damp rag.
Increase ventilation if possible during this time. You can probably hear the chick breaking out of the egg (pipping). Do not open up the incubator to sneak a peek, if you are curious then you could get an incubator that has viewing windows. Even after they are all out you can keep them in the incubator for several hours. The chicken eggs should hatch within 24 hours.
Sometimes a chick won’t be able to break free. At this point, you can dip the egg in warm water if there are no cracks. Then you can chip carefully and slowly chip off a piece of the shell (very carefully and very slowly) at which point you just put it back in the incubator and pray. If there is no more hatching going on by the end of day 22 then I’m pretty sure that there will be no more chicks.
Step 8: Move the chicks to the brooder and clean the incubator after
The chicks can be moved directly to the brooder after the deformed chicks have been removed. Clean the incubator after the hatched chicks and unhatched eggs have been removed and before reusing the incubator.
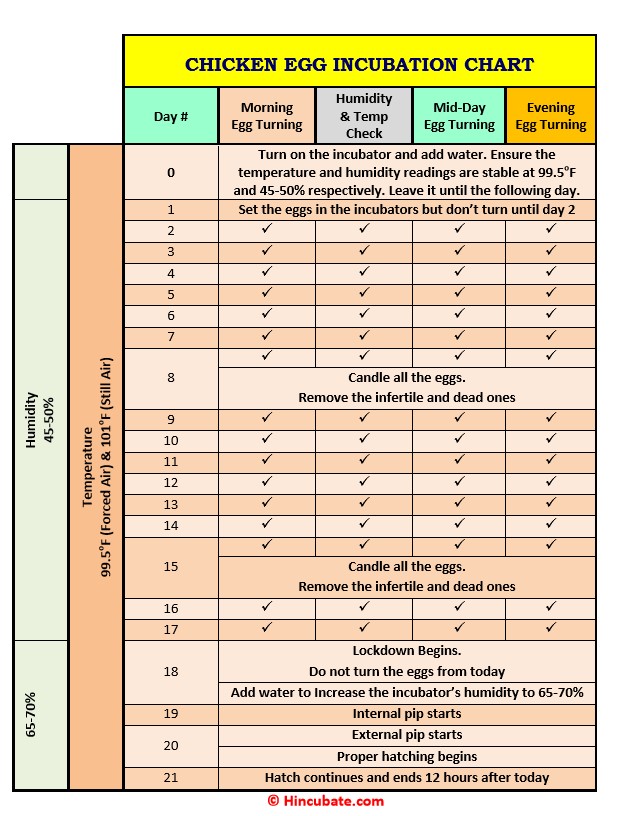
Chicken Egg Incubation Chart
I have designed a simple chicken egg incubation chart for anyone who wants to hatch their eggs at home. This incubation chart shows the ideal temperature, humidity, and turning frequency for each day of the 21-day incubation period. It also includes some tips and reminders for a successful hatch. You can download the chart as a PDF file or print it.